 Tom McLaughlin

This is part 1 of a 2 part series detailing an AWS Lambda and serverless development workflow. Here we will discuss everything we do before coding; design and project setup. In part 2 we will cover the steps after you have done your coding; testing and debugging.

The first step in software development isn't to code, it is to understand. First, we want to understand the problem we are trying to solve. Second, we want to understand how we'll solve this problem. This up front planning is essential to minimizing frustration later on in serverless development.
Defining and Diagramming What To Build
The first thing I do is define exactly what I’m trying to solve and then how I’m going to solve it. From there, I don’t go to an editor, but instead to a diagramming tool like draw.io, Lucidchart, or Cloudcraft.
The technical problem I’m trying to solve is as follows:
Send AWS Health notifications to a Slack channel.
Diagraming
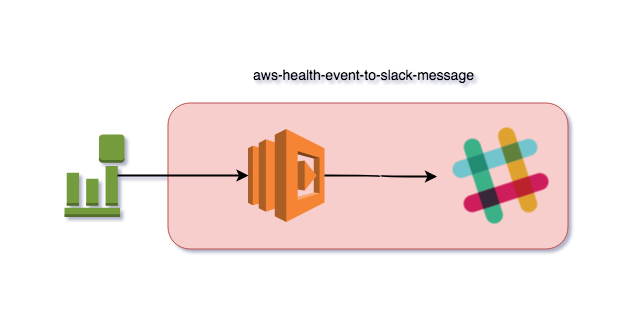
To get the notifications, AWS publishes Health notification messages (though not global and regional issue messages) as CloudWatch events from the source aws.health. My initial diagram looks roughly like this:
However, I have a second project in my backlog which also required writing messages to Slack. Because of that I’ll make an architectural change and split this into two smaller nanoservices. This way I can write the Slack publisher and then reuse it in my next project. My new diagram looks like this:
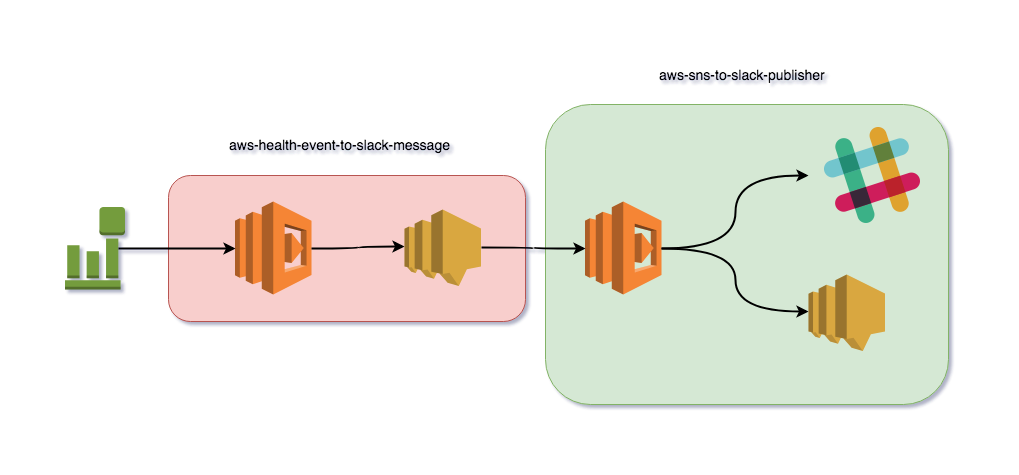
I have two technical problems to solve now:
Format a CloudWatch Health event as a Slack message and publish via SNS.
Receive an SNS message event and publish the Slack message contained to Slack.
These are the two services that I’ll end up building to solve these problems.
You may notice I include these diagrams in most of my project README files. This is to make it easier for me to keep track of what I’m building today, understand what I built many months down the road, and for someone new to better understand the parts that make up the service.
If you find yourself not largely settled on a design that you’ve reviewed and thought over, you will find yourself regularly spinning your wheels. Remember, anytime you want to change the structure of the service you have to change both the code and your infrastructure definition for deploying it. This can cause much wasted time.
Interfaces
The next step is to define the input and output interfaces of the services. If you’re dealing with AWS services as event sources, in this case I’m using CloudWatch to trigger aws-health-event-to-slack-message and SNS to trigger aws-sns-to-slack-publisher, then you need to bookmark the page below. You will be referring to this page on a regular basis.
Since I’m connecting aws-health-event-to-slack-message and aws-sns-to-slack-publisher via SNS there’s an additional interface to define and that is the shape of the data being transported in the SNS message. For that, I’ll use Slack's chat.postMessage API. Keep in mind that this means I have a string value that is itself a JSON formatted message. The data in the SNS message will look something like this:
{
  ...
  "Message": "{\"text\": \"AWS Health Notification\", "attachments": [ ... ]}
  ...
}
Also keep in mind that if another service can format data to the Slack API spec and publish it via SNS, then aws-sns-to-slack-publisher can publish that data to Slack as well!
Project Setup
Now it’s finally time to start thinking about code. Here’s where I initialize the project and start building the services to solve my problem.
Project Initialization
I start by setting up my new projects. My own prefered tool for managing serverless systems is Serverless Framework. (There’s also AWS SAM CLI and Pulumi among others.) If you have NodeJS installed then installing Serverless Framework is as sample as.
npm install -g serverless
There’s two primary features I love about Serverless Framework:
- Plugin support and its ecosystem
- Initializing projects via a template
I’ve discussed before how to create a new Serverless Framework project from scratch. Having done that enough times and learning something new each time, I’ve created a Serverless Framework template for AWS Lambda Python 3.6. This saves me a ton of time when creating new services. There’s more in my template than in my previous blog post because I’m always adding as aI learn.
I’ll create a new project for the Slack publisher service by doing the following:
serverless create -u https://github.com/ServerlessOpsIO/sls-aws-python-36 -p aws-sns-to-slack-publisher -n aws-sns-to-slack-publisherThe template provides my new service with standardized:
- Project layout and structure.
- Method for setting deployment stages.
- Method for setting AWS account profile to use.
- Tagging of AWS resources in a consistent manner.
With the service project initialized I can start flushing it out.
Event Definition
At this point, I’ll create an event file in the tests/events/ directory.
$ tree tests/events/
tests/events/
└── aws-sns-to-slack-publisher.json
This is just a file with raw event data in it. Here’s an example event for aws-sns-to-slack-publisher. It’s an SNS event and in Records[0].Sns.Message there is a string value with an escaped Slack API JSON doc.
{
  "Records": [
    {
      "EventVersion": "1.0",
      "EventSubscriptionArn": "arn:aws:sns:us-east-1:000000000000:test-topic:0c31b8f8-398c-4bb0-ad4a-437b7113ad06",
      "EventSource": "aws:sns",
      "Sns": {
        "SignatureVersion": "1",
        "Timestamp": "1970-01-01T00:00:00.000Z",
        "Signature": "EXAMPLE",
        "SigningCertUrl": "EXAMPLE",
        "MessageId": "95df01b4-ee98-5cb9-9903-4c221d41eb5e",
        "Message": "{\"text\": \"AWS-SNS-TO-SLACK-PUBLISHER TEST MESSAGE\"}",
        "MessageAttributes": {
          "Test": {
            "Type": "String",
            "Value": "TestString"
          },
          "TestBinary": {
            "Type": "Binary",
            "Value": "TestBinary"
          }
        },
        "Type": "Notification",
        "UnsubscribeUrl": "EXAMPLE",
        "TopicArn": "arn:aws:sns:us-east-1:000000000000:test-topic",
        "Subject": "TestInvoke"
      }
    }
  ]
}
I’ll use this event first as a reference while I code. Later it’ll be used in testing and debugging.
Coding
At this point I can begin coding. Though if you’re into test driven development you’ll be eager to move onto part 2 of this series. Either way, I’m not going to spend much time on the code as a lot of what I’ve learned is covered in Serverless Framework Intro Project and the process for building this project, not the actual code, is what I want to focus. I’ll just leave a few things here.
You’ll need to understand the Lambda function interface for your chosen language as it varies by language. The function interfaces for the different supported languages can be found in the Lambda Function Programming Model.
Also, check the Serverless Framework plugin registry, or NPM, for plugins to handle common tasks in your development workflow. As an example, I use serverless-python-requirements to handle bundling dependencies so I don’t have to think about them after they’ve been defined in requirements.txt.
What Comes Next?
Once you're finished here, take a look at part 2 of this series. There we go through our development workflow after we've finished our initial coding. We'll cover the process of testing and debugging. Read on for:
Find what you've just read useful? Want to use serverless more in your organization? Have a look at the DevOps transformation and AWS cloud advisory services ServerlessOps provides.