 Tom McLaughlin

This is Part 2 of the series Hello Serverless, a guide aimed at the individual or team that is building their first serverless application. This series addresses the common conceptual and tactical questions that occur during the serverless development and operational lifecycle. This post covers what the Hello Serverless application would look like if it were an application intended to run on a host instance or in a container. We use a Python Flask application for this purpose.
Understanding what Hello Serverless should do and how it should function, let’s start by building an application we might run in a container or directly on a host instance. This is an application built using the web application framework Python Flask. If you’re from the JavaScript world, you might think of this as analogous to NodeJS Express.
Here are some simple diagrams of what the application and its file structure look like and. The code for the application used in this post can be found here on GitHub.
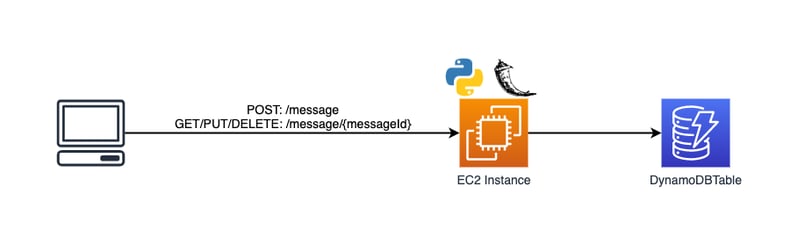
A Python Flask Application
Our application code is structured in a manner that many Python Flask applications use.
./
├── Dockerfile
├── Pipfile
├── Pipfile.lock
├── README.md
├── app
│   ├── __init__.py
│   ├── models
│   │   ├── __init__.py
│   │   └── message.py
│   └── routes
│       ├── __init__.py
│       └── message.py
├── docker-local-entry.sh
├── gunicorn.conf.py
├── logging.conf
└── wsgi.py
The root of the application has a wsgi.py file that is referenced by our web server. The application itself is a Python package named app that is located under app/ directory. Further, there are app.routes and app.models packages located respectively under app/routes/ and app/models/. The app.routes package is where the application’s REST endpoints are defined, while app.models is where business logic resides.
Application Initialization
Application initialization is split across two files. One file launches the application instance while the other effectively assembles the application and returns an instance to the launcher.
wsgi.py
#'''WSGI entry'''
import app
handler = app.create_app()


if __name__ == '__main__':
    # Entry point when run via Python interpreter.
    print("== Running in debug mode ==")
    app.create_app().run(host='0.0.0.0', port=8080, debug=True)
The wsgi.py file launches the application. It does so by calling app.create_app() which returns an object instance of the application and assigning it to the variable named handler. Then our WSGI web server, such as Gunicorn, would use handler as the entry point to the application.
app/__init__.py
'''Application entry point'''
import os
from flask import Flask


def _initialize_blueprints(app) -> None:
    '''Register Flask blueprints'''
    from app.routes.message import message
    app.register_blueprint(message)


def create_app() -> Flask:
    '''Create an app by initializing components'''
    app = Flask(__name__)
    _initialize_blueprints(app)
    # Do it!
    return app
The Python Flask application is contained in the app module found in the app/ directory. The app/__init__.py file provides the interface to the app module. The module imports the Flask class from the flask module and in create_app(), which we saw in wsgi.py, a Flask object instance is created, has its application routes registered, and then is returned.
To launch the application with gunicorn, we would run the following command, which tells the web server that the application entry point can be found in the wsgi module’s (wsgi.py) handler resource.
gunicorn wsgi:handlerRoute Definitions & Request Logic
In the previous part of this series, I defined these two areas of code separately because they do different things. Route definitions define the HTTP URL and method combinations supported by the application, and request logic defines the logic for handling a request. The two are directly linked because each route definition is attached to a request logic function.
app/routes/message.py
'''Message operation routes'''
from json import dumps as jsondump
from flask import Blueprint, jsonify, request
from app import models

message = Blueprint('message', __name__)


@message.route('/message', methods=['POST'])
def create_message():
    '''Create message'''
    item = request.get_json(force=True)
    message_id = models.message.create_message(item)
    response = {
        'success': True,
        'message': message_id
    }
    status_code = 200
    return jsonify(response), status_code


@message.route('/message/', methods=['GET'])
def retrieve_message(message_id):
    '''Retrieve message'''
    response = models.message.retrieve_message(message_id)
    status_code = 200
    return jsondump(response, cls=models.DecimalEncoder), status_code


@message.route('/message/', methods=['PUT'])
def update_message(message_id):
    '''Update message'''
    item = request.get_json(force=True)
    models.message.update_message(message_id, item)
    response = {'success': True}
    status_code = 200
    return jsonify(response), status_code


@message.route('/message/', methods=['DELETE'])
def delete_message(message_id):
    '''Delete message'''
    models.message.delete_message(message_id)
    response = {'success': True}
    status_code = 200
    return jsonify(response), status_code
The app/routes/message.py file starts by importing a few modules including app.models, which provides functions to work with message items in DynamoDB.
Next we’ll focus on the Python decorators to define the application’s routes. For example, the code below defines a route for a GET method request to the /message/<message_id> URL path, where message_id is a variable value.
@message.route(‘/message/<message_id>’, methods=[‘GET’])Below that Python decorator is a function called retrieve_message() that takes the message_id from the route and retrieves the message by using the app.models.dynamodb.retrieve_message() function. Finally, that data returned from DynamoDB via app.models.dynamodb.retrieve_message() is returned along with an HTTP status code by retrieve_message() to the client that made the request.
def retrieve_message(message_id):
    '''Retrieve message'''
    response = models.message.retrieve_message(message_id)
    status_code = 200
    return jsondump(response, cls=models.DecimalEncoder), status_code
What we’ve established now is an application route exposed by the application and the logic that will execute when a request is received by that route.
Business Logic
When a request has been made to a route and request logic executes, we call business logic in the form of functions from the app.model.message module. This is where our application does the majority of the work for managing messages.
app/models/__init__.py
'''Shared code'''
from decimal import Decimal
import json


class DecimalEncoder(json.JSONEncoder):
    '''Convert decimal values returned by boto3 DDB deserializer'''
    def default(self, obj):
        if isinstance(obj, Decimal):
            return int(obj)
        return super(DecimalEncoder, self).default(obj)
This file includes a helper class, DecimalEncoder, for working with DynamoDB. It’s a class for converting decimal values to integers that can be passed as an encoder class argument to the json module’s dumps() function. This class exists because the AWS Python SDK, boto3, stores numeric values from DynamoDB as Decimal types and they do not properly deserialize when converting from a Python dictionary to a JSON document.
app/models/message.py
'''Message related operations'''
import os
from datetime import datetime
from uuid import uuid4
import boto3

DDB_TABLE_NAME = os.environ.get('DDB_TABLE_NAME')
ddb_res = boto3.resource('dynamodb')
ddb_table = ddb_res.Table(DDB_TABLE_NAME)


def create_message(item: dict) -> dict:
    '''Transform item to put into DDB'''
    dt = datetime.utcnow()
    item['pk'] = str(uuid4())
    item['sk'] = 'v0'
    item['timestamp'] = int(dt.timestamp())
    r = ddb_table.put_item(
        Item=item
    )
    return {'message_id': item['pk']}


def retrieve_message(message_id: str) -> dict:
    '''Get item in DDB'''
    r = ddb_table.get_item(
        Key={
            'pk': message_id,
            'sk': 'v0'
        }
    )
    item = r.get('Item', {})
    return item


def update_message(message_id: str, item: dict) -> dict:
    '''Update item in DDB'''
    attribute_updates = {}
    for key in item.keys():
        attribute_updates[key] = {'Action': 'PUT', 'Value': item.get(key)}

    r = ddb_table.update_item(
        Key={
            'pk': message_id,
            'sk': 'v0'
        },
        AttributeUpdates=attribute_updates
    )
    return r


def delete_message(message_id: str) -> dict:
    '''Delete item in DDB'''
    r = ddb_table.delete_item(
        Key={
            'pk': message_id,
            'sk': 'v0'
        },
    )
    return r
This file handles our basic operations for creating, retrieving, updating, and deleting message items from the application’s DynamoDB table. In create_message(), you can see where the pk key with a UUID as a value is added to the message item. In retrieve_message(), we see where the pk key from the DynamoDB item is replaced by the message_id key. And in update_message(), the updated message data is transformed into the structure for a DynamoDB update item operation.
Something some people might notice is I didn’t write a Python class for managing messages. It’s reasonable to have a class considering every function uses the same DynamoDB table resource created at the top of the file. I didn’t do this because as we iterate over the application to make it serverless that would obscure some of the changes, or lack of, along the way.
Moving Forward To Serverless
Now we have a fully functional Python Flask CRUD application and you can see the different parts of the code that make up the application. From here we’re going to turn this into a serverless application and we’re going to see two different ways of going serverless. Neither one is right or wrong, it’s just a matter of preference. What you should pay close attention to is how the code we’ve just walked through remains largely unchanged and you should be able to see the direct parallels between each version of the application.
Continue on to Part 3 of the series, Serverless Monoliths. There we'll take the first step towards serverless by performing a lift and shift of this application.