 Faizan Bashir

This is our first ServerlessOps contributor blog post series. If you too would like to share what you're building and learning about serverless on AWS then drop us a message!

A few years ago AWS launched static website hosting on S3, which was a major shift for web hosting. The tech was crystal clear, all the static assets (HTML, CSS, and JS) would reside in an S3 bucket to host your impressive website. A pretty cool idea I personally liked but it still couldn't handle one of the most important use cases, the contact form. Today, in steps AWS Lambda to the rescue.
Keep reading and by the end of this post you will be able to handle your website forms in the most inexpensive and simplest manner possible.
The Serverless AppOur serverless solution makes use of AWS infrastructure, it consists of API Gateway, Lambda Functions, DynamoDB and Simple Email Service(SES). To deploy and manage this, we'll use Serverless Framework.

Here's the parts that make up the application:
- Static Website — Amazon S3 provides a robust and simple web server. All of the static HTML, CSS and JS files for your application can be served from S3. A static page will make an AJAX request to an API Gateway endpoint.
- API Gateway — The API Gateway is the event source for the application, it acts as a bridge between our contact form and serverless lambda function. It routes the request from the contact form to the lambda function. The API Gateway also performs tasks such as access control, monitoring, API version control and traffic management.
- AWS Lambda — AWS Lambda is where the action takes place. Lambda functions run in stateless compute containers that are event-triggered, managed, and ephemeral. In our example, we use a lambda function to send email using SES and store the request contents in DynamoDB.
- Simple Email Service (SES) — The cloud-based email sending service from Amazon. Scalable email service, you can send marketing and transactional emails using SES. In our example, we use SES to send emails using a verified email address.
- DynamoDB — DynamoDB provides a scalable, consistent, fully managed and non-relational database from Amazon. In our example, we use DynamoDB to store and retrieve the messages received from the static contact form.
You can find the source code for the demo application here on GitHub. Go ahead and clone it!
Application Walkthrough
Let’s have a stroll through the demo application before we actually deploy it on AWS.
1. Demystifying The serverless.yml File
The serverless.yml file defines the services the application needs to use and interact with. The resources and the actions of the serverless functions can perform are listed under the iamRoleStatements property. It lists the actions and resources.
iamRoleStatements:
  - Effect: "Allow"
    Action:
      - ses:SendEmail
      - ses:SendRawEmail
    Resource: "*"
  - Effect: "Allow"
    Action:
      - dynamodb:Scan
      - dynamodb:PutItem
    Resource: "arn:aws:dynamodb:${opt:region, self:provider.region}:*:table/${self:provider.environment.DYNAMODB_TABLE}"
In the serverless.yml we are allowing the serverless functions to use SES:SendEmail and DynamoDB:PutItem actions among many others defined above.
Since Lambda runs serverless functions in the cloud, we need to define the functions somewhere. Functions are defined using the functions property and we have defined two, sendMail and list. For both functions we've defined an HTTP event that will trigger their execution. This will also create an API Gateway resource for the application.
functions:
  sendMail:
    handler: handler.sendMail
    description: Send Email using AWS SES Service
    events:
      - http:
          path: sendMail
          method: post
          integration: lambda
          cors: true
          response:
            headers:
              "Access-Control-Allow_Origin": "'*'"
  list:
    handler: handler.list
    description: List all the contact form submissions
    events:
      - http:
          path: list
          method: get
          integration: lambda
          cors: true
          response:
            headers:
              "Access-Control-Allow_Origin": "'*'"
2. Creating Resources
With Serverless Framework you create resources like a DynamoDB table as we have done here. This snippet of code is responsible for creating a DynamoDB table with the given configuration.
resources:
  Resources:
    ContactFormDynamoDbTable:
      Type: 'AWS::DynamoDB::Table'
      DeletionPolicy: Retain
      Properties:
        AttributeDefinitions:
          -
            AttributeName: id
            AttributeType: S
        KeySchema:
          -
            AttributeName: id
            KeyType: HASH
        ProvisionedThroughput:
          ReadCapacityUnits: 1
          WriteCapacityUnits: 1
        TableName: ${self:provider.environment.DYNAMODB_TABLE}
3. Peek Into The Serverless Functions
The demo application is written in Python, it uses boto3 AWS SDK to send emails using SES and for performing read/write operations on DynamoDB.
python-ses-dynamodb-contactform/handler.py
import boto3
from botocore.exceptions import ClientError
import json
import os
import time
import uuid
import decimal

client = boto3.client('ses')
sender = os.environ['SENDER_EMAIL']
subject = os.environ['EMAIL_SUBJECT']
configset = os.environ['CONFIG_SET']
charset = 'UTF-8'

dynamodb = boto3.resource('dynamodb')

def sendMail(event, context):
    print(event)

    try:
        data = event['body']
        content = 'Message from ' + data['firstname'] + ' ' + data['lastname'] + ',\nMessage Contents: ' + data['message']
        saveToDynamoDB(data)
        response = sendMailToUser(data, content)
    except ClientError as e:
        print(e.response['Error']['Message'])
    else:
        print("Email sent! Message Id:"),
        print(response['MessageId'])
    return "Email sent!"

def list(event, context):
    table = dynamodb.Table(os.environ['DYNAMODB_TABLE'])

    # fetch all records from database
    result = table.scan()

    #return response
    return {
        "statusCode": 200,
        "body": result['Items']
    }

def saveToDynamoDB(data):
    timestamp = int(time.time() * 1000)
    # Insert details into DynamoDB Table
    table = dynamodb.Table(os.environ['DYNAMODB_TABLE'])
    item = {
        'id': str(uuid.uuid1()),
        'firstname': data['firstname'],
        'lastname': data['lastname'],
        'email': data['email'],
        'message': data['message'],
        'createdAt': timestamp,
        'updatedAt': timestamp
    }
    table.put_item(Item=item)
    return

def sendMailToUser(data, content):
    # Send Email using SES
    return client.send_email(
        Source=sender,
        Destination={
            'ToAddresses': [
                data['email'],
            ],
        },
        Message={
            'Subject': {
                'Charset': charset,
                'Data': subject
            },
            'Body': {
                'Html': {
                    'Charset': charset,
                    'Data': content
                },
                'Text': {
                    'Charset': charset,
                    'Data': content
                }
            }
        }
    )
The sendMail function is triggered when a POST request is received from the contact form on the /sendMail path. The list function is triggered by a GET request to /list path defined in the serverless.yml file.
Building the Application
Now that you have set up and configured the Serverless Framework in your machine, it’s time to get things rolling.
1. Clone the application
Let’s start by cloning the application from Github.
git clone https://github.com/faizanbashir/python-ses-dynamodb-contactform
cd python-ses-dynamodb-contactform
2. Verify e-mail address with SES
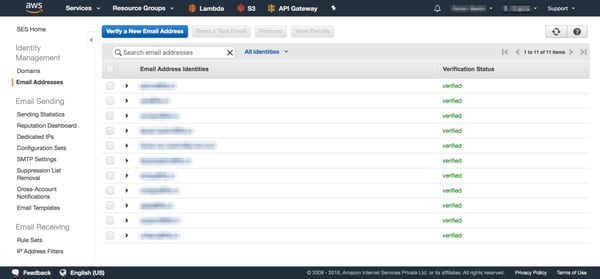
Fast-forward to verifying the email you intend to send email from SES. All you need to do is add an email address, AWS will send you a verification with a link to verify the email address.
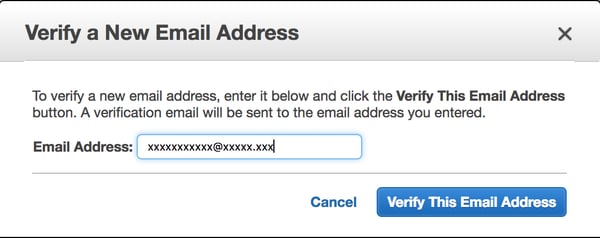
After verifying the email address, the “Verification Status” for the email will show up as “verified”.
3. Configuring the application
You need to configure the serverless.yml with your account specific details to make it work. Replace the region, profile and SENDER_EMAIL properties in serverless.yml as seen here:
provider:
  name: aws
  runtime: python2.7
  region: <aws-region>
  profile: <aws-user>
  ...
environment:
  SENDER_EMAIL: <verified-email-address>
Awesome! with the configuration done you can turn your attention to deploying the application.
4. Deploying to AWS
Everything in place now you can deploy the application with a single command, ain’t that super cool. It will take a minute or two to execute if you religiously followed this tutorial, at the end it will provide you a list of endpoints to use for calling our functions. It will look something like this:
sls deploy -v
---SNIP---
endpoints:
  POST - https://xxx.execute-api.xx.amazonaws.com/development/sendMail
  GET - https://xxxx.execute-api.xx.amazonaws.com/development/list
5. Testing the endpoints
Now that we have the endpoints let’s test application to see if it’s working or not. The /sendMail endpoint expects input in JSON format. If the email is sent and the entry is written to DynamoDB the request will return the response "Email Sent!".
curl \
    --header "Content-Type: application/json" \
    --request POST \
    --data '{"firstname": "John", "lastname": "Doe", "email": "john@doe.com", "message": "Hi there"}' \
    https://xxx.execute-api.xx.amazonaws.com/development/sendMail

> "Email Sent!"
Now, let’s test the /list endpoint in the same manner with the GET endpoint you got after deploying the application.
curl https://xxxx.execute-api.xx.amazonaws.com/development/list
{"body": [{"firstname": "John", "lastname": "Doe", "email": "john@doe.com", "updatedAt": 1529425349731, "message": "Hi there", "id": "f651c404-73dc-11e8-bf3e-be54be0b5d22, "createdAt": 1529425349731}], "statusCode": 200}
6. The Contact Form
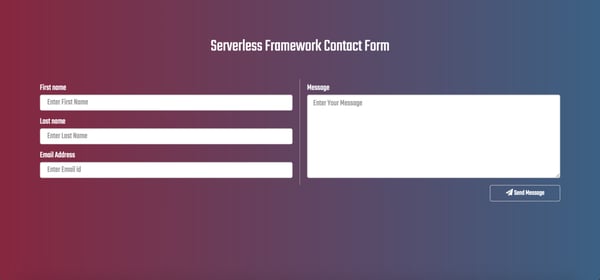
With the serverless functions working properly we can go ahead and integrate it into our static contact form. The static form code is in the public folder.
cd public//Insert your lambda function URL here
var URL = "https://xxx.execute-api.xx.amazonaws.com/development/sendMail";Navigate to the page using the file:///<path>/<to>/<folder>/index.html in the browser or upload it to S3 bucket and enable static hosting.
aws s3 sync public s3://your-bucket-name
Treat yourself with a Cappuccino, Latte or <insert-your-favorite-drink>. You just implemented a cool way to keep your website on static hosting with handling your forms, thanks to serverless.
Afterthoughts
Serverless is definitely the way forward, not just for the worlds static contact forms. Serverless has opened a universe of opportunities for you, the contact form was just to get started with. How about using serverless for your website analytics, a visitor counter or maybe click tracking?
Endless opportunities are waiting for you. It'll be an awesome journey!