 Tom McLaughlin


While looking for a project to work on, I noticed there’s a very simple serverless pattern that I don’t see written about much: website hosting. We often immediately think of Lambda with AWS serverless, but it is more than just functions-as-a-service (FaaS). A simple use case like hosting a static website can be done without need for EC2, and it can be managed using Serverless Framework.
Let’s walk through how to deploy a static website using Serverless Framework. Even dynamic websites often have static assets, and the information below should be useful to anyone building websites on AWS.
Using S3 to Host a Static Website
If you’re building an internal company website, website prototype, or simply one you don’t intend to see much traffic, S3 may be the right choice for you. Why?
- S3 provides a simple and convenient method for hosting a static website.
- S3 provides an easy and cheaper solution for smaller scale sites.
S3 hosting has its limitations though. For high traffic sites with distributed viewership, CloudFront is better suited for static web hosting. In addition, if you require SSL and your own domain name, then you will need CloudFront. However, based on your needs and requirements, you may not need the added complexity and cost. We’ll address adding CloudFront in a later post.
What We’re Building
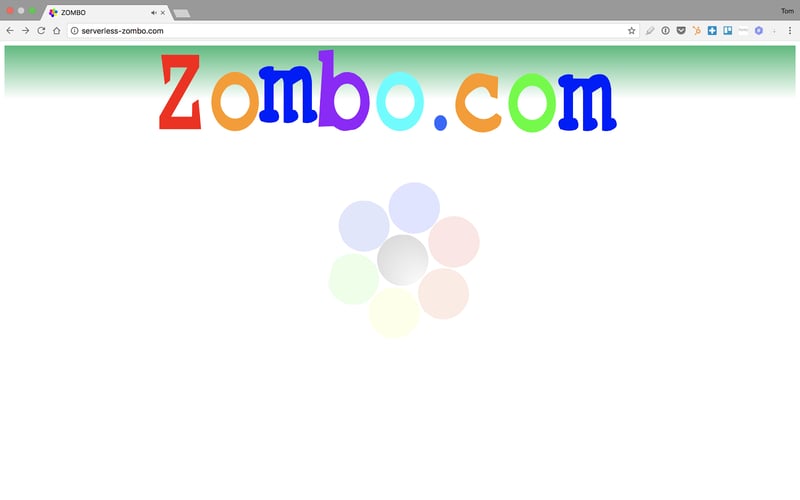
We’ll deploy a website consisting of a static HTML page with sound and graphics. If you’ve been on the internet for a long time, you will enjoy the site to be deployed. If this site is new to you, then welcome to Zombo.Com! (The original site was written in Flash and this is based off of the HTML5 port port of the original.) It’s straightforward, fun, and proof that you can do anything with serverless.
How It’s Built
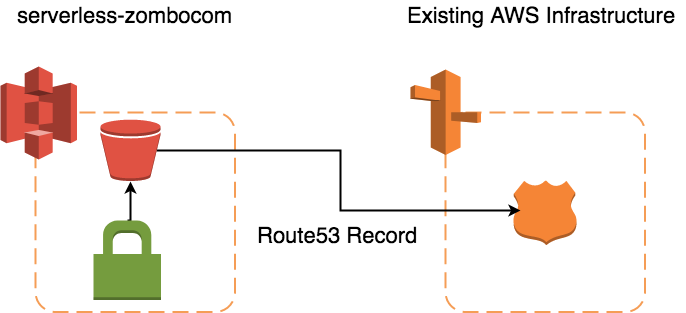
Now, let’s walk through how to build this project! The project will need the following resources created:
- S3 Bucket
- S3 Bucket Policy
- Route53 Resource Record
We’ll assume that a Route53 Zone resource already exists in the environment. Depending on your needs, you may create a zone in your own project. Since zones are typically shared resources, I chose to create the zone separate from the serverless-zombocom project.
The project looks roughly like this:
Serverless Framework Setup
Our project is deployed and managed with Serverless Framework. One of the advantages it has over other serverless management frameworks is its robust plugin ecosystem (which we’ll get into soon). We’ll need Node.JS and NPM installed in order to use it. Once those are installed, we can install Serverless Framework doing the following:
npm install -g serverlessWith Serverless Framework installed, we can go ahead and create our project. The `serverless` command can create projects of different types using templates. However, since we’re not using Lambda, what we choose doesn’t really matter. The hello-world template will be good enough.
serverless create -t hello-world -n serverless-zombocom -p serverless-zombo.com
cd serverless-zombocom
What will be created is a serverless.yml template file, a basic handler script (which we’ll discard), and a .gitignore.
Serverless Framework doesn’t handle uploading files to an S3 bucket natively, but that’s where its plugin system really shines. You’re not limited to Serverless Framework’s existing functionality. Somebody else thought having the ability to upload files to an S3 bucket would be useful, as well. We’ll use the the serverless-s3-sync plugin; this lets us define a local directory of files to upload and a Bucket and optional prefix to upload them to.
Install the plugin by running the following:
serverless plugin install -n serverless-s3-syncNow that our project is setup with Serverless Framework, let’s move on to configuring the project’s resources.
Project Layout
Let’s take a brief look at our project’s layout now. We’ve removed the handler.js file since we won’t be needing it. You can pretty much ignore package.json, package-lock.json and node_modules. They’re a result of NPM package management. The README.md is where we can provide people some quick documentation about this project.
The static/ directory has been added, and the site static assets have been placed there. Any files in the static/ directory are what will be uploaded to S3. In that directory, we have all the glory that is zombo.com
The serverless.yml file is where we’ll configure the service. We’ll come back to this file since it is what drives our project.
Here’s what the directory structure looks like -- The contents of node_modules/ has been snipped for clarity.
serverless-zombo.com
├── README.md
├── node_modules
│ └── <SNIP>
├── package-lock.json
├── package.json
├── serverless.yml
└── static
    ├── favicon.ico
    ├── index.html
    ├── zombo.mp3
    ├── zombo.ogg
    └── zombocom.png
Project Resources
We’ll now start configuring our service using the serverless.yml. I’ve gone ahead and cleaned up the file a little for us to start. This is what serverless.yml looks like now.
service: serverless-zombocom
plugins:
  - serverless-s3-sync

custom:

provider:
  name: aws
  runtime: nodejs6.10
We have no functions so I’ve removed that section. I’ve moved the plugins section towards the top. I’ve also gone ahead and set the provider to AWS. Note: I’ve left the runtime unchanged because it needs to be defined even though it’s not relevant to our project.
Notice the empty custom section. The custom section in serverless.yml let’s you define configuration and variables that will be reused elsewhere in your template. In that section later on, we’ll add things like S3 file sync configuration and the DNS record information for the site.
AWS S3 Bucket And Bucket Policy
We’ll start by adding our S3 bucket where the static files will reside.
resources:
  Resources:
    StaticSite:
      Type: AWS::S3::Bucket
      Properties:
        AccessControl: PublicRead
        BucketName: ${self:custom.siteName}
        WebsiteConfiguration:
          IndexDocument: index.html
For S3 site hosting, the AccessControl property must be set to PublicRead. The WebsiteConfiguration is where we define the index document for the site. The value is the same index.html in the static/ directory. Typically, you don’t need to name a bucket because the CloudFormation generated bucket name will do but that is not the case here. We’re going to create a Route53 Alias record and when doing that, the S3 bucket name and DNS record name need to match. We’ll add a serverless variable as the BucketName and a key to the custom section to define it like so below:
custom:
  siteName: serverless-zombo.com
To grant access to the static content, we attach a permissive bucket policy.
    StaticSiteS3BucketPolicy:
      Type: AWS::S3::BucketPolicy
      Properties:
        Bucket:
          Ref: StaticSite
        PolicyDocument:
          Statement:
            - Sid: PublicReadGetObject
              Effect: Allow
              Principal: "*"
              Action:
              - s3:GetObject
              Resource:
                Fn::Join: [
                  "", [
                    "arn:aws:s3:::",
                    {
                      "Ref": "StaticSite"
                    },
                    "/*"
                  ]
                ]
The bucket policy grants the s3:GetObject to all principals for any object in the bucket. In the S3 bucket resource, we didn’t provide a bucket name and that’s no problem. Notice under Bucket and Resource, we use the CloudFormation Ref intrinsic function to get the name of the bucket that is a part of the stack.
With the S3 bucket resources added, we’ll add the S3 bucket syncing information. This is done in the custom section mentioned earlier.
custom:
  siteName: serverless-zombo.com
  s3Sync:
    - bucketName: ${self:custom.siteName}
      localDir: static
The s3Sync key takes a list of bucket and directory pairs to sync. The bucketName key takes the name of the S3 bucket as set bt BucketName that we added earlier. The localDir key is the relative path to the directory to be synced to S3 which is static/. Additional configuration options can be found in the plugins documentation. Now, when the service is deployed, the contents of static/ will be uploaded to S3.
With the S3 bucket configured, it’s time to setup DNS so people can access the site with an easy to remember domain name.
Route53 Record
We’ll now create a Route53 record that will point serverless-zombo.com to the S3 bucket. We won’t be using a CNAME, though! Route53 does not allow CNAMEs at the apex of a domain, but we can create an A record that is an alias to an AWS resource, like an S3 bucket.
    DnsRecord:
      Type: "AWS::Route53::RecordSet"
      Properties:
        AliasTarget:
          DNSName: ${self:custom.aliasDNSName}
          HostedZoneId: ${self:custom.aliasHostedZoneId}
        HostedZoneName: ${self:custom.siteName}.
        Name:
          Ref: StaticSite
        Type: 'A'
The record requires an alias target which consists of a DNS name and a hosted zone ID. We’ll come back to those below. Notice the name property is a reference to the StaticSite S3 bucket resource. The name of the S3 bucket and DNS record need to match and by using a resource reference instead of a Serverless variable we ensure Cloudfromation creates the S3 bucket before it attempts to update DNS.
With the Route53 record configured, the aliasDNSName ,aliasHostedZoneId, and siteName keys need to be set in the custom section of the file.
custom:
  hostedZoneName: serverless-zombo.com
  aliasHostedZoneId: Z3AQBSTGFYJSTF    # us-east-1
  aliasDNSName: s3-website-us-east-1.amazonaws.com
  s3Sync:
    - bucketName: ${self:custom.hostedZoneName}
      localDir: static
The SiteName value is being used as the name of the Route53 domain the record should be created in, and because we’re not using a subdomain, it doubles as the name of the record to create. The aliasHostedZoneId is the zone ID of the S3 bucket domain. We’re using us-east-1 and have given the value for that. To get the appropriate aliasHostedZoneId value, see the AWS documentation. Also note that if we changed the region this was deployed to, we’d have to update that value too.
Deploying
With the serverless.yml completely written, we can now deploy.
serverless deploy -vNow, if we browse to http://serverless-zombo.com, we are brought back to internet in its glory days.
Conclusion
This is just one way to create a static site on AWS using S3. It’s quick and it’s easy but it has its limitations. For one thing, unless you want to access the site via the S3 bucket URL and not the DNS record created, SSL will throw an error due to an invalid cert. S3 has no SSL cert for the DNS domain we’re using. In addition, we’re limited to a single AWS region which means the site is subject to issues in us-east-1 and we’d need to redeploy if the site was rendered unusable. S3 also isn’t the fastest at serving up web content.
Using CloudFront would let us handle SSL certs, and distribute our content to multiple edge locations to avoid issues in a single datacenter region and provide quicker response times. Does that make CloudFront better? Why would you ever serve a site using S3?...
The answer lays in the fact that the right system to build is dependent on your requirements. CloudFront is also an added cost. If you don’t have an SSL requirement, you can handle the occasional blip in us-east-1, and the slightly slower (possibly unnoticeable) response time difference is not an issue, then this might be the perfect solution for you.
If this isn’t the right solution for you, we’ll cover S3 backed CloudFront in a following blog post.
Find what you've just read useful? Want to use serverless more in your organization? Have a look at the DevOps transformation and AWS cloud advisory services ServerlessOps provides.